Saturday, October 31, 2009
Chocolate: Cookies & Cake
Last month I shared with you my enjoyment for baking, which is often curbed by not having softened butter at the exact moment I want to bake. Twice this month, I was smart enough to leave unsalted butter out on the kitchen island over night, preparing me for baking in the morning.
I'm not really a baker, though. Sure, I can knock out pastry shells in a breeze (mostly) and cakes are generally problem-free, but I lack finesse when it comes to decorating cakes or dealing with small baked goods. Most cakes I make are not frosted or decorated in any other way, and I have never really handled cookie dough - why go to so much trouble when they are so cheap to buy? I suppose with making them yourself, you can design your own cookies, for not every cookie is available at the supermarket or your local bakery. Also, one cannot have a true appreciation for such things without understanding the process.
 Like most human beings, my angelheart Eric and I favour chocolate cookies. If all cookie manufacturers were to go out of business, the last cookie off the production line in the western world would probably be a variety of chocolate cookie. It must not come, therefore, as a surprise to anyone that my second ever attempt at making cookies (the first were vanilla shortbread made 4 or 5 years ago!) is a chocolate cookie, one that was presented by Martha Stewart in a recent publication of her peerless lifestyle magazine, Martha Stewart Living. The recipe was not especially highlighted, but it captured my attention because I could sense that behind its apparent simplicity was a depth of flavour.
Dark-Chocolate Cookies from Martha Stewart Living, July 2009. (Click on the link to take you to the recipe.)
I did not divert from the recipe, really, but as I am not a cookie maker, I had to improvise with utensils to stand in for cookie cutters (which would have made life easy because they are sharp and cut through dough without any issues), and I let the cookies cook 30 seconds longer than I should have - the nose knows, after all. I was impatient with the filling and whipped it for volume, but it still ran, as you can see in the photo above. All of this in mind, the only things I would think of doing next time around are:
1) Add a tablespoon of finely ground coffee or instant coffee granules to the dough;
2) Roll the dough out thicker (Martha did give instructions, but it is hard to work this out by sight); and
3) Add brandy to the filling.
 Like cookie dough, I'm a bit stumped when it comes to icings and glazes for cake decorating. Try as I may to follow recipes, I never seem to be able to pull off a great icing. It could be to do with lack of aesthetic instinct when it comes to applying icing, and it could also be that the recipes themselves are not the best, but it is probably because I have no real experience yet that lends to reading and handling icing. I found that the relationship between the recipes below and above rest in the icing, so attempting the mere variations twice in one month has certainly educated me...
All-in-One Chocolate Cake
(from Diana Henry's Cook Simple)
For the Cake:
125g/4.5oz self-raising flour, sifted
pinch of salt
55g/2oz cocoa powder
3 eggs, lightly beaten
175g/6oz caster sugar
175g/6oz unsalted butter, softened and diced
1 tablespoon vanilla extract
4 tablespoons warm water
1) Pre-heat oven to 190 C/375 F.
2) Put all ingredients but warm water into a bowl or food processor and beat until combined.
3) Add water slowly and combine again.
4) Pour cake batter into a greased cake tin, preferably 20cm/8" springform, though I used 22cm/9" and it worked out well, but the cooking time was shorter, for the cake was not as thick.
5) Place cake on the middle rack in the oven and bake for 25-30 minutes or until done.
6) Turn out of springform and leave to cool on wire rack.
For the Icing:
150g/5.5oz chocolate, broken into pieces
75ml/2oz sour cream
75ml/2oz heavy cream
5 tablespoons dark brown sugar
1) Put all ingredients in a bowl that is to be suspended over summering water (the water should never touch the bowl and should not bee too hot) and allow ingredients to melt.
2) Stir ingredients together and take off the heat.
3) Leave icing to cool and thicken.
 In terms of presentation, I slathered the icing all over the cake and coated it with toasted slivered almonds - hazelnuts might have been better, but chocolate pairs pretty well with all nuts.
This is the perfect cake to whip up at a moment's notice - but for the softened butter. Even the most baking-averse person could achieve this, a simple though flavourful chocolate cake. As always, you could substitute one-third of the flour with a nut flour (such as almond or hazelnuts) for added sophistication in the general flavour profile, but this cake can stand well on its own - so much so that I might go so far to consider it my stand-by when I'm in a pinch.
What special cake recipe do you rely on for social gatherings?
I'm not really a baker, though. Sure, I can knock out pastry shells in a breeze (mostly) and cakes are generally problem-free, but I lack finesse when it comes to decorating cakes or dealing with small baked goods. Most cakes I make are not frosted or decorated in any other way, and I have never really handled cookie dough - why go to so much trouble when they are so cheap to buy? I suppose with making them yourself, you can design your own cookies, for not every cookie is available at the supermarket or your local bakery. Also, one cannot have a true appreciation for such things without understanding the process.
 Like most human beings, my angelheart Eric and I favour chocolate cookies. If all cookie manufacturers were to go out of business, the last cookie off the production line in the western world would probably be a variety of chocolate cookie. It must not come, therefore, as a surprise to anyone that my second ever attempt at making cookies (the first were vanilla shortbread made 4 or 5 years ago!) is a chocolate cookie, one that was presented by Martha Stewart in a recent publication of her peerless lifestyle magazine, Martha Stewart Living. The recipe was not especially highlighted, but it captured my attention because I could sense that behind its apparent simplicity was a depth of flavour.
 Dark-Chocolate Cookies from Martha Stewart Living, July 2009. (Click on the link to take you to the recipe.)
I did not divert from the recipe, really, but as I am not a cookie maker, I had to improvise with utensils to stand in for cookie cutters (which would have made life easy because they are sharp and cut through dough without any issues), and I let the cookies cook 30 seconds longer than I should have - the nose knows, after all. I was impatient with the filling and whipped it for volume, but it still ran, as you can see in the photo above. All of this in mind, the only things I would think of doing next time around are:
1) Add a tablespoon of finely ground coffee or instant coffee granules to the dough;
2) Roll the dough out thicker (Martha did give instructions, but it is hard to work this out by sight); and
3) Add brandy to the filling.
 Like cookie dough, I'm a bit stumped when it comes to icings and glazes for cake decorating. Try as I may to follow recipes, I never seem to be able to pull off a great icing. It could be to do with lack of aesthetic instinct when it comes to applying icing, and it could also be that the recipes themselves are not the best, but it is probably because I have no real experience yet that lends to reading and handling icing. I found that the relationship between the recipes below and above rest in the icing, so attempting the mere variations twice in one month has certainly educated me...
All-in-One Chocolate Cake
(from Diana Henry's Cook Simple)
For the Cake:
125g/4.5oz self-raising flour, sifted
pinch of salt
55g/2oz cocoa powder
3 eggs, lightly beaten
175g/6oz caster sugar
175g/6oz unsalted butter, softened and diced
1 tablespoon vanilla extract
4 tablespoons warm water
1) Pre-heat oven to 190 C/375 F.
2) Put all ingredients but warm water into a bowl or food processor and beat until combined.
3) Add water slowly and combine again.
4) Pour cake batter into a greased cake tin, preferably 20cm/8" springform, though I used 22cm/9" and it worked out well, but the cooking time was shorter, for the cake was not as thick.
5) Place cake on the middle rack in the oven and bake for 25-30 minutes or until done.
6) Turn out of springform and leave to cool on wire rack.
For the Icing:
150g/5.5oz chocolate, broken into pieces
75ml/2oz sour cream
75ml/2oz heavy cream
5 tablespoons dark brown sugar
1) Put all ingredients in a bowl that is to be suspended over summering water (the water should never touch the bowl and should not bee too hot) and allow ingredients to melt.
2) Stir ingredients together and take off the heat.
3) Leave icing to cool and thicken.
 In terms of presentation, I slathered the icing all over the cake and coated it with toasted slivered almonds - hazelnuts might have been better, but chocolate pairs pretty well with all nuts.
 This is the perfect cake to whip up at a moment's notice - but for the softened butter. Even the most baking-averse person could achieve this, a simple though flavourful chocolate cake. As always, you could substitute one-third of the flour with a nut flour (such as almond or hazelnuts) for added sophistication in the general flavour profile, but this cake can stand well on its own - so much so that I might go so far to consider it my stand-by when I'm in a pinch.
What special cake recipe do you rely on for social gatherings?
Labels: Chocolate, Chocolate Cake, cookies, Diana Henry, Martha Stewart
Tuesday, June 17, 2008
Pumpkin Pie
 One of the truest signs of the onset of winter is the presence of pumpkins and squashes in the markets. It is perhaps no surprise that pumpkins were part of the welcoming gift basket from Native Americans to the newly arrived English at Plymouth Rock in the 1620s, for the appearance of their curvy figures and cheerful colours are both inviting and comforting. While pumpkins and squashes look gorgeous on the mantelpiece, dining table or at the foot of a door, their creamy textures make for divine treats, such as pumpkin pie.
 I have had an odd fascination with pumpkin pies since childhood. Their ostensible glow seemed to me symbols of unity and warmth in many of the shows I grew up watching, such as Sesame Street, The Cosby Show, and Peanuts cartoons. I was, however, always baffled at the idea that a dessert could be made from pumpkin, for my exposure to Cinderella's vehicle-in-waiting were smiling, boiled wedges. (To boil slices of pumpkin should be a culinary crime since they already contain so much water, which essentially displaces its mild sweetness and earthy flavours.) When I moved to the US just before Thanksgiving in 2001, I finally had the opportunity to try this practically mythologised pie, but the moment of eating a slice overpowered the actual eating of it - so much so that after I scoffed my portion of pie, I was not certain that I liked it.
What I have since found singularly surprising is that many pumpkin pies are made with butternut squash. Given the difference in natural and detectable sweetness, this makes sense. But a pumpkin pie made with butternut squash should still nod to the great Thanksgiving pumpkin, and I do this by using pepitas in both the pie crust and pie filling a la Martha Stewart.

Pepitas are hulled pumpkin seeds - oval and the colour of deepest jade. When ground they are a glorious mint green, fairy dust similar to fine powdered green tea. When I think of baking pies, I often look to add ground nuts or seeds to any crust, for it makes them taste more like the ingredients they contain. If, however, you are making a pie whose principal ingredient does not have nuts or seeds, then use nuts or seeds that complement the principle ingredient (for example, almonds pair so well with cherries, though having said that, grinding a few cherry kernels is not impossible, if you can be botherd to smash them).
I have followed Martha Stewart's recipe for Pumpkin Pie with Candied Pepitas before, and while gorgeous, I have since adapted it to suit my proclivities. I am not huge on cloves - her recipe begs for but a pinch, but I find it too overpowering, preferring instead to use cloves sparingly in braised dishes or mulled wine. You can reduce the amount of spices by 1/4 if you prefer, but I find that without the overt presence of spices, pumpkin pie tastes odd - it just does not quite sell me as a dessert. Having said that, if you leave the pie for one day, the profound nature of the spices will permeate the filling, adding gorgeously subtle notes to every bite.
Pumpkin Pie with Candied Pepitas
(Adapted from Martha Stewart Living, November 2006)
For the graham crust:
2/3 cups all-purpose flour
1/3 cup whole-wheat flour
1/4 cup ground pepitas
1/2 teaspoon salt
1/2 teaspoon ground nutmeg
1/2 cup (113g) unsalted butter, softened
1/3 cup light brown sugar, packed
1) Combine flours, pepitas, salt, and cinnamon (either with a whisk or in a food processor).
2) Add butter and sugar and proccess and rub fat in until mealy (you can also do this with a food processor).
3) When dough comes together, press it into a 23cm/9" or 25cm/10" springform pan or single-crust metal pie plate, then freeze for 15 minutes.
For the filling:
1 small butternut squash (approximately 3/4 kg/ 1 1/2lb)
3 large eggs, lightly beaten
3/4 cup light brown sugar, packed
1 tablespoon corn starch
1/2 teaspoon salt
1/2 teaspoon ground nutmeg
1/4 teaspoon ground ginger
pinch of cayenne pepper
1 1/2 cups evaporated milk
1) Slice butternut squash in half and roast at 220 C/425 F, cut-side down, for 50-60 minutes.
2) When cool enough to handle, discard the seeds from the cavity and puree the flesh. You need about 1 1/2 cups packed butternut squash puree for this recipe.
3) Preheat oven to 180 C (350 F).
4) Bake crust (after it has been in the freeze for 15 minutes) until dry and golden brown - about 20 minutes - and then let cool completely.
5) Reduce oven temperature to 170 C (325 F).
6) Whisk pumpkin and eggs in a bowl.
7) In a separate bowl, combine brown sugar, cornstarch, salt, and spices.
8) Whisk dry ingredients into the pumpkin mixture.
9) Whisk in evaporated milk.
10) Tap firmly on counter to release air bubbles *you can let it stand for 20 minutes to ensure this as well).
11) Pour filling into graham crust; tap to release air bubbles.
12) Bake until set, approximately 50 minutes. I like to leave it in the oven for an extra couple of minutes to encourage a caramelisation to occur on the surface of the pie, lending a burnished shade that contrasts with the rich and bright orange of the pie filling.
For the candied pepitas:
1 1/4 cups pepitas
5 tablespoons sugar
1 large egg white, beaten
pinch of coarse salt, plus more for seasoning
pinch of ground ginger
pinch of cayenne pepper
1) Preheat oven to 180 C (350 F).
2) Stir ingredients together in a bowl.
3) Spread mixture in a single layer on a baking sheet lined with parchment paper.
4) Bake until pepitas are golden and slightly puffed, approximately 10 minutes. 5) Season with salt.
6) Stir gently, forming some into clumps.
7) Let cool completely in a bowl before storing in an air-tight container for up to three days. Sprinkle a small handful over pumpkin pie (the remainder of which makes for sweet snacking).
 The colour and aromas of this pie are so enticing that they beg to be enjoyed in the company of good friends and family. The pumpkin pie's understated yet celebratory appearance make it a perfect feature for every holiday table, or at this time of year when one is tempted to break in the pumpkins and squashes of the season but is not quite ready for their savoury elements. The comforting glow as a slice on a plate is a culinary refuge when looking out at the gloomy skies on the other side of the window panes.
(And happy birthday to the stylish and effervescent Ailene!)
Labels: Autumn, Butternut Squash, Fall, Martha Stewart, Pumpkin Pie
Friday, November 23, 2007
Pear Crisp
 It is Thanksgiving in the United States of America, my second home. My angelheart Eric returned to LA yesterday after a heavenly 8-day sojourn in New Zealand, which was far too short. Although terribly depressed, as anyone is when apart from his or her most loved one, I am thankful that he was able to come over and spend some time with me, for it may not be months now until we next see each other.
As is typical in a state of sadness, I felt the need to bake. I also wanted to contribute something to the Thanksgiving table. Of course, we don't have cans of pumpkin purée lining our supermarket shelves in New Zealand - at least, not typically - and butternut squash is not in season, so I couldn't make any purée for myself. I headed to the market for other American favourites in the Autumn: pears and pecan nuts.
I first had pecans by way of the infamous Southern delight: pecan pie. Pandoro Panetteria in Parnell (on the inner-city fringe of Auckland) used to make a nutty and sweet pecan pie. I adored its custard filling made with both brown and white sugar. I say this in past tense because I haven't had one for years and don't know if they still make it. I should stop by. It is criminal that I never had one in all of my years (and Thanksgivings) in the USA - or, at least, I didn't have one that I remember.
I do like pecans a great deal, though. I love their oval shape and the ridges cracked into their maple-to-deep brown skin. Pecans are rich in flavour, particularly of butter, which is perfectly heightened with any recipe that involves melted or brown butter. Storing them isn't terribly difficult. According to the National Center for Home Food Preservation, shelled pecans should be refrigerated or frozen. They need to be kept away from air and light as they have a high oil content; exposure to heat will quickly make the pecan's natural oil go rancid.
Thanksgiving is a time of year that is associated with all things richly hued. This is the season in which I never seem to tire of the clichés that are presented in store fronts or on magazine covers, where everything is brown, orange and burnt red. Deep in a sepia haze, one can be forgiven for wondering what it's like to see "normal" again. Of course, I don't find it suffocating or overwhelming because I don't have the cultural associations that go along with it, whether it be dealing with the emotions caused by family hysteria or by a post-colonial reality. But bring it on: roasted squash, braised mustard greens, carrot puree, fennel gratin, roast turkey (first brined then stuffed with citrus), toffee apples, maple ice cream, brown butter sauce, dark cups of coffee, pumpkin pie, and, of course, all the nuts of the fall: hazelnuts, chestnuts, and pecans...
Pear Crisp
(Adapted from the Brown-Sugar Apple Cake recipe in Martha Stewart Living, October 2006)
95 1/2g (3 1/3oz) butter, melted
2 medium pears (I used Bosc), approximately 2/3 kg (1 1/2lb)
1/4 teaspoon ground cinnamon
1/4 teaspoon ground nutmeg
1 tablespoon granulated sugar
2/3 cup brown sugar, any colour depending on desired depth of flavour
2/3 cup all-purpose flour
1/2 teaspoon salt
1 egg, lightly beaten
2/3 cup pecans, toasted and coarsely chopped
1) Preheat oven to 180 C (350 F).
2) Butter a loaf pan. Mine measures 22 x 13cm (8 1/2 x 5").
3) Peel, core and cut pears into 1cm (> 1/3" but < 1/2") slices. You can dice them, if you prefer a neater presentation when the crisp is inverted after the initial cooling period once baked.
4) Add sliced pears to a medium bowl and toss them with the cinnamon, nutmeg and granulated sugar.
5) Spread the spicy pear slices on the bottom of the loaf pan.
6) In a large bowl, whisk together the brown sugar, flour and salt.
7) Add the egg and butter and whisk until just combined.
8) Stir in the pecans.
9) Pour batter over the spicy pear slices.
10) Bake until the top is a maple brown and a skewer comes out clean, approximately 35 minutes. I checked after 25 minutes and poured out any excess butter that was bubbling on top.
11) Let cool slightly on a rack.
12) Use a knife around the edges of the loaf pan to loosen and invert.
13) Cut into squares or cut across into slices.
 The base is chewy and redolent of the butteriness imparted by the pecans, the toasted pieces of which full each mouthful with warmth. The soft slices of pear are spicy in the most comforting of ways - What would Thanksgiving be without spices?
 To my angelheart Eric and all my wonderful American friends:
Happy Thanksgiving!

Labels: Afternoon Tea, Crisp, Holidays, Martha Stewart, Pear, Thanksgiving
Saturday, November 25, 2006
Thanksgiving
 Because this was going to be my last Thanksgiving in the U.S. for a while, I wanted to celebrate it twice. Well, I'm not sure that Thanksgiving is really a holiday for celebrating per se, but in the five years I've lived here, no one has given the traditional "let's be thankful for this, that and the other" speech, and no one appears to reflect on what one must be thankful for (the gas-guzzling? the waste in the landfills that we've created?). So, I'll just say here that I'm thankful for my experiences in the U.S. and the loved ones with whom I've been happy to share this period of time.
 Mostly I'm just thankful for good food.

The first Thanksgiving meal was spent at our friend Suzanne's. It was especially glorious because our good friend, Ailene, celebrated with us (her husband has made the move out of state, and she is going to join him very soon), and Suzanne made turkey for the first time. She brined the 8 pound turkey for five hours before roasting it for a couple more hours. The baste consisted of butter, thyme, and lemon zest. Though there was no stuffing, the turkey's cavity was filled up with lemons and oranges, and they perfumed the succulent meat splendidly.
For my part, I made Roasted Root Vegetables with Honey, Balsamic Vinegar, and Fresh Goat Cheese and Pumpkin Pie with Candied Pepitas and Dried Fig and Coffee Ice Cream.
 For the vegetables, I wanted a twist on tradition. I have had a million variations of roasted vegetables - after all, I'm from New Zealand, a land where The Sunday Roast is an institution that harks back to New Zealand's colonial days. I wanted to make something with big flavours and lots of style. To accomplish both of these, I turned to my angelheart Eric's favorite celeb chef (and one of mine, too), Tyler Florence. His new cookery book, Tyler's Ultimate, builds on the theme of his Food Network show in which he creates contemporary twists on traditional fare (not always traditional in the American sense, either, for some of my favourite shows include his renditions of paella, lasagne, and English roast chicken).
 Roasted Root Vegetables with Honey, Balsamic Vinegar, and Fresh Goat Cheese (from Tyler Florence's Tyler's Ultimate)
3 medium carrots, peeled and cut into two-inch long pieces (5.5 cm)
2 medium beets, peeled and cut into sixths
2 medium turnips, peeled and cut into sixths
2 fennel heads, outer leaves stripped and cut into quarters
3 shallots, unpeeled, cut in half lengthwise
1/4 cup olive oil
Kosher salt and freshly ground black pepper
1/4 cup honey
1/4 cup balsamic vinegar
4 oz chilled fresh goat cheese
1) Preheat oven to 350 deg. f. (195 deg. c.).
2) Toss vegetables with olive oil, salt and pepper on a baking sheet. Spread vegetables out in a single layer once done.
3) Roast vegetables for 25 minutes.
4) Whisk together honey and vinegar, then pour onto roast vegetables and toss them together.
5) Roast vegetables for 20 minutes, or until they are fork-tender and caramelized.
6) Top vegetables with pieces of goat cheese.
I had never had pumpkin pie before this Thanksgiving, and because I knew no one was going to make it, I wanted to take a risk and do it myself. Besides, if I failed, I was not concerned with not being invited to a Thanksgiving meal next year since I'd be back in New Zealand. Admittedly, I was very nervous. Who best to turn to other than the undisputed queen of the American lifestyle, Martha Stewart? The Martha Stewart Living, November 2006 magazine is really quite fabulous, and I was beaming when I came across her recipe. I don't know if most recipes call for the spices she does, but I was thrilled beforehand knowing the mellow depth they'd add, and I looked forward to making my own graham crust. As for the candied pepitas, I didn't even know what pepitas were, so I figured it was a good opportunity to find out. They are hulled pumpkin seeds - so now we all know.
Pumpkin Pie with Candied Pepitas
(From Martha Stewart Living, November 2006)
For the graham crust:
2/3 cups all-purpose flour
1/3 cup whole-wheat flour
1/4 cup ground pepitas
1/2 teaspoon salt
1/4 teaspoon ground cinnamon
1/2 cup (113g) unsalted butter, softened
1/3 cup light brown sugar, packed
1) Combine flours, pepitas, salt, and cinnamon (either with a whisk or in a food processor).
2) Add butter and sugar and proccess I did this in a bowl with my own hands, but you can do so with a food processor).
3) When dough comes together, put in a 9 or 10 inch single-crust metal pie plate (I actually put mine in my 10" fluted tart pan), and then freeze for 15 minutes.
For the filling:
1 1/2 cups canned solid-pack pumpkin (or 1 small sugar pumpkin roasted cut-side down at 425 deg. f./220 deg. c. for 50-60 minutes)
3 large eggs, lightly beaten
3/4 cup light brown sugar, packed
1 tablespoon corn starch
1/2 teaspoon salt
1/4 teaspoon ground allspice
pinch of cayenne pepper
pinch of ground clove
1 1/2 cups evaporated milk
1) Preheat oven to 350 deg. f. (180 deg. c.).
2) Bake crust (after it has been in the freeze for 15 minutes) until dry and golden brown - about 20 minutes - and then let cool completely.
3) Reduce oven temperature to 325 deg. f. (170 deg. c.).
4) Whisk pumpkin and eggs in a bowl.
5) In a separate bowl, combine brown sugar, cornstarch, salt, and spices.
6) Whisk dry ingredients into the pumpkin mixture.
7) Whisk in evaporated milk.
8) Tap firmly on counter to release air bubbles and let stand for 20 minutes.
9) Pour filling into graham crust; tap to release air bubbles.
10) Bake until set, approximately 50 minutes.
For the candied pepitas:
6 oz (2 cups) pepitas
5 tablespoons sugar (the recipe actually calls for 6 tablespoons)
1 large egg white, beaten
pinch of coarse salt, plus more for seasoning
pinch of ground allspice
pinch of cayenne pepper
1) Preheat oven to 350 deg. f. (180 deg. c.).
2) Stir ingredients together in a bowl.
3) Spread mixture in a single layer on a baking sheet lined with parchment paper.
4) Bake until pepitas are golden and slightly puffed, approximately 10 minutes.
5) Season with salt.
6) Stir gently, leaving some clumps.
7) Let cool completely in a bowl before storing in an air-tight container for up to three days. Sprinkle a small handful over pumpkin pie and save the rest for snacking :-)
 Of course, most people have cream on the side or on top of their pumpkin pie. I, of course, wanted something a little different. Tamasin Day-Lewis is very inspiring, and, like Nigella Lawson, has interesting dessert ideas. I was eager to make something from her latest book, Tamasin's Kitchen Classics,which is divided into the following sections: A Classic Start, the Main Course, Classic Cakes (interesting twists, such as Rhubarb and Ginger Crumble Cake and Upside-Down Pear and Spice Cake), A Classic Finish (desserts, such as Redcurrant Curd Ice Cream and Black Forest Trifle) and Basics (stocks and pastries). It is a gorgeous and hunger-inducing book - my latest "must have". Tamasin's Dried Fig and Hazelnut Ice Cream sounded like too much of a dream to pass up, especially since I had good organic dried figs on hand. I omitted the praline and substituted the vanilla base for one of coffee).
 Dried Fig and Coffee Ice Cream
(Adapted from Tamasin Day-Lewis' Tamasin's Kitchen Classics)
9 large, whole dried organic figs
3 tablespoons squeezed orange juice
2 tablespoons cognac
1 cup whole milk, well chilled
3/4 cup granulated sugar
3 tablespoons instant espresso or coffee
2 cups heavy (double) cream
1 teaspoon pure vanilla extract
1) Chop the figs into small dice and soak them in the orange juice and cognac for 4-6 hours.
2) In a medium bowl, whisk to combine milk, sugar and espresso powder until sugar and powder are dissolved.
3) Stir in the cream and vanilla extract.
4) Put into ice cream maker with the liquid that the figs have not absorbed.
5) Once churned, fold figs pieces into the ice cream and freeze.
 For the second Thanksgiving dinner, we ate at my angelheart's sister's with his mother, brother-in-law, and two-and-a-half-year-old nephew. On the menu were cornish game hens stuffed with bulgur wheat, raisins, and pine nuts (which you can read about here), sauteed spinach with garlic, and prosciutto-wrapped scallops and shrimp. Eric's sister's dessert didn't quite turn out, but she made Lemon Madelines during the day. It is a recipe from Martha Stewart's Baking Handbook, and I'm tempted to make them in the future because they were simultaneously fluffy and substantial, and the combination of almond and lemon in heavenly.
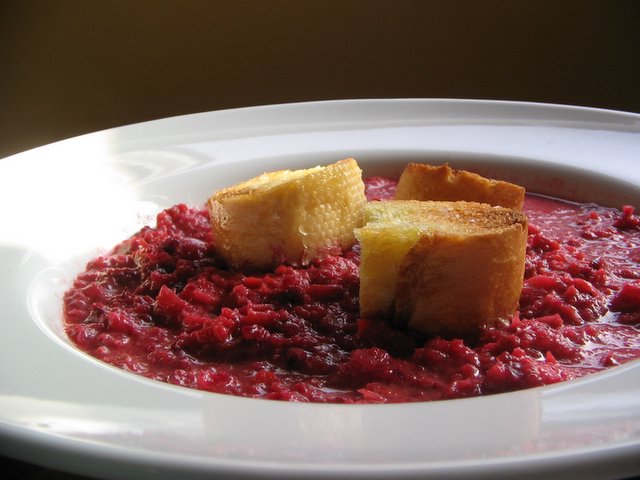
As for leftovers, today I made soup out of the Roasted Root Vegetables by blending the vegetables with some hot chicken stock and seasoning, topped with croutons that were rubbed with garlic.
Happy Post-Thanksgiving everyone!
Labels: Holidays, Ice cream, Martha Stewart, Pie, Pumpkin Pie, Tamasin Day-Lewis, Thanksgiving, Tyler Florence
![]()